1. SFTPの設定 (サーバー側)
1.1. 公開鍵認証の有効化
1. ssh_config を編集して、公開鍵認証を有効にします。
[root@localhost ~]# cd /etc/ssh/
[root@localhost ssh]#
[root@localhost ssh]# ls -l
合計 608
-rw-r--r--. 1 root root     581843  8月  9  2019 moduli
-rw-r--r--. 1 root root       2276  8月  9  2019 ssh_config
-rw-r-----. 1 root ssh_keys    227 12月 11  2022 ssh_host_ecdsa_key
-rw-r--r--. 1 root root        162 12月 11  2022 ssh_host_ecdsa_key.pub
-rw-r-----. 1 root ssh_keys    387 12月 11  2022 ssh_host_ed25519_key
-rw-r--r--. 1 root root         82 12月 11  2022 ssh_host_ed25519_key.pub
-rw-r-----. 1 root ssh_keys   1675 12月 11  2022 ssh_host_rsa_key
-rw-r--r--. 1 root root        382 12月 11  2022 ssh_host_rsa_key.pub
-rw-------. 1 root root       3906 10月 30 19:59 sshd_config
-rw-------. 1 root root       3907  8月  9  2019 sshd_config_20241030
[root@localhost ssh]#
[root@localhost ssh]# vi ssh_config
変更前 (デフォルト)
PubkeyAuthentication yes変更後
PubkeyAuthentication no2. sshd を再起動して設定変更を反映させます。
[root@localhost ssh]# systemctl restart sshd
[root@localhost ssh]#
2. キーペアの作成 (クライアント側)
2.1. キーペアの作成
ssh-keygen -t rsa コマンドで公開鍵と秘密鍵を作成します。
※下記はWinodwsの例ですがLinuxでも同じです。
C:\Users\admin> ssh-keygen -t rsa
Generating public/private rsa key pair.
Enter file in which to save the key (C:\Users\admin/.ssh/id_rsa): 何も入力せずにEnter
Enter passphrase (empty for no passphrase): 何も入力せずにEnter
Enter same passphrase again: 何も入力せずにEnter
Your identification has been saved in C:\Users\admin/.ssh/id_rsa
Your public key has been saved in C:\Users\admin/.ssh/id_rsa.pub
The key fingerprint is:
SHA256:C9Kj+URdcIYnnfp81PVqVP+8/5n+KNpHsUNTWyddhoc admin@work01
The key's randomart image is:
+---[RSA 3072]----+
| .oo. ++|
| o++ E.O|
| +. . **|
| . … . *.o|
| . = So . o *.|
| = o .o . * o|
| o . . . o ..|
| o .. .oo|
| . …oo+B|
+----[SHA256]-----+
C:\Users\admin>
C:\Users\[ユーザー名]\.ssh 配下に秘密鍵(id_rsa) と 公開鍵 (id_rsa.pub) が作成されたことを確認します。

3. 公開鍵の登録
3.1. sftp 接続用ユーザーの作成
既存のユーザーを使う場合はこの手順はスキップしてください。
[root@localhost ~]# useradd sftp-user01
[root@localhost ~]#
3.2. 公開鍵の登録
1. SFTP接続用のユーザーでログインまたは、SFTP接続用のユーザーにスイッチし、ホームディレクトリ配下に .ssh ディレクトリを作成します。
※.ssh ディレクトリの権限は 700 に設定します。7 は、所有者(ユーザー)に「読み・書き・実行」の権限を与えることを意味します。
[root@localhost ~]# sudo su - sftp-user01
[sftp-user01@localhost ~]$
[sftp-user01@localhost ~]$ pwd
/home/sftp-user01
[sftp-user01@localhost ~]$
[sftp-user01@localhost ~]$ mkdir .ssh
[sftp-user01@localhost ~]$
[sftp-user01@localhost ~]$ chmod 700 .ssh
[sftp-user01@localhost ~]$
[sftp-user01@localhost ~]$ cd .ssh/
[sftp-user01@localhost .ssh]$
[sftp-user01@localhost .ssh]$ pwd
/home/sftp-user01/.ssh
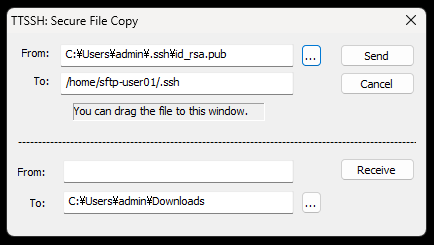
2. クライアントで作成した公開鍵をサーバーに転送します。

3. id_rsa.pub の内容を authorized_keys に追記します。
※authorized_keys は所有者(ユーザー本人)のみに読み書きが許可されるように権限を 600 に設定します。
※id_rsa.pub は不要なので削除して問題ありません。
[sftp-user01@localhost .ssh]$ cat id_rsa.pub >> authorized_keys
[sftp-user01@localhost .ssh]$
[sftp-user01@localhost .ssh]$ ls
authorized_keys  id_rsa.pub
[sftp-user01@localhost .ssh]$
[sftp-user01@localhost .ssh]$ chmod 600 authorized_keys
[sftp-user01@localhost .ssh]$
[sftp-user01@localhost .ssh]$ rm id_rsa.pub
rm: 書き込み保護されたファイル 通常ファイル `id_rsa.pub' を削除しますか? yes
[sftp-user01@localhost .ssh]$
4. クライアントからサーバーへの接続
sftp [ユーザー名]@sftpサーバーのホスト名またはIPアドレス コマンドでsftpサーバーに接続します。
C:\Users\admin>sftp sftp-user01@172.168.10.10
The authenticity of host '172.168.10.10 (172.168.10.10)' can't be established.
ED25519 key fingerprint is SHA256:FcT1ua2oBKvwb4XmB+kneORUimnJWrvu1L0W2qNQhLU.
This key is not known by any other names.
Are you sure you want to continue connecting (yes/no/[fingerprint])?
Please type 'yes', 'no' or the fingerprint:
Warning: Permanently added '172.168.10.10' (ED25519) to the list of known hosts.
Connected to 172.168.10.10.
sftp>
sftp>
sftp>
以上。


コメント